Work History

Suzana-Smilevski-North-West-London-Tile-Doctor

Welcome to my Work History archive where you will find detailed examples of Tile, Grout and Stone Cleaning and renovation work carried out within North West London.

Weathered Limestone Patio and steps Restored in Wembley

Weathered Limestone Patio and Steps Restored in Wembley

Here we have a Limestone garden patio and set of steps at a property in Wembley which had become heavily affected by lichen, mould and general outdoor soiling. The stone was in good physical condition but had spent the winter in a shaded position where it slowly turned green. The patio had lost its original appearance and the owner was keen to make use of it again and so I was asked to make it presentable again.

External Limestone Patio and Steps Before Cleaning Wembley External Limestone Patio and Steps Before Cleaning Wembley

It was clear that the Limestone needed a thorough deep clean and then sealing to protect it going forward so I worked out a detailed quote for its renovation which would take two of our technicians two days to compete. Fortunately, we were in the middle of a heat wave at the time so I wasn’t worried about rain interrupting the work.

Cleaning Limestone Patio and Steps

The first stage was to treat the Limestone with Tile Doctor Nanotech HBU remover which would tackle the mould and lichen. HBU stands for Heavy Build-Up and left to dwell on the surface for approximately 15 minutes to break down the organic growth before being scrubbed in. This was mostly done by hand due to the location of the capping stone and steps. The area was then rinsed with fresh water and the resulting slurry and soiling removed using a wet vacuum.

Next, a dilution of Tile Doctor Pro-Clean was applied and worked into the Limestone using a slow-speed orbital machine fitted with fine burnishing pads. This provided a deeper clean, removing the ingrained dirt and organic staining without being overly aggressive on the limestone.

After cleaning, the stone was thoroughly wet vacuumed and rinsed with fresh water before being left to dry in preparation for sealing.

Sealing Garden Limestone

Once the Limestone had been allowed to dry overnight, it was sealed with two applications of Tile Doctor Ultra-Seal. This helped protect the porous stone from future staining and makes the patio and steps easier to maintain. This product is an invisible impregnator that soaks into the stone, occupying the pores and ensuring dirt remains on the surface where it can be easily cleaned away.

External Limestone Patio and Steps After Renovation Wembley

Apologies for the photographs only some of these had to be taken from within the property itself to get the best angle.

Limestone Patio Aftercare

To help maintain the appearance of the restored limestone, the customer was left with a bottle of Tile Doctor Neutral Tile Cleaner, together with cleaning and maintenance guidelines.

The combination of the correct cleaning method, tried and tested Tile Doctor products and professional equipment has restored the appearance of this shaded limestone patio and its steps, giving the customer a much cleaner and better-protected outdoor space.


Professional Restoration of a Limestone Terraced Patio and Steps in Northwest London

Weathered Limestone Patio and Steps Restored in Wembley Read More »
Limestone Tiled Floor Repair and Restoration Southall

Cracked Limestone Tiled Kitchen Floor Fully Restored in Southall

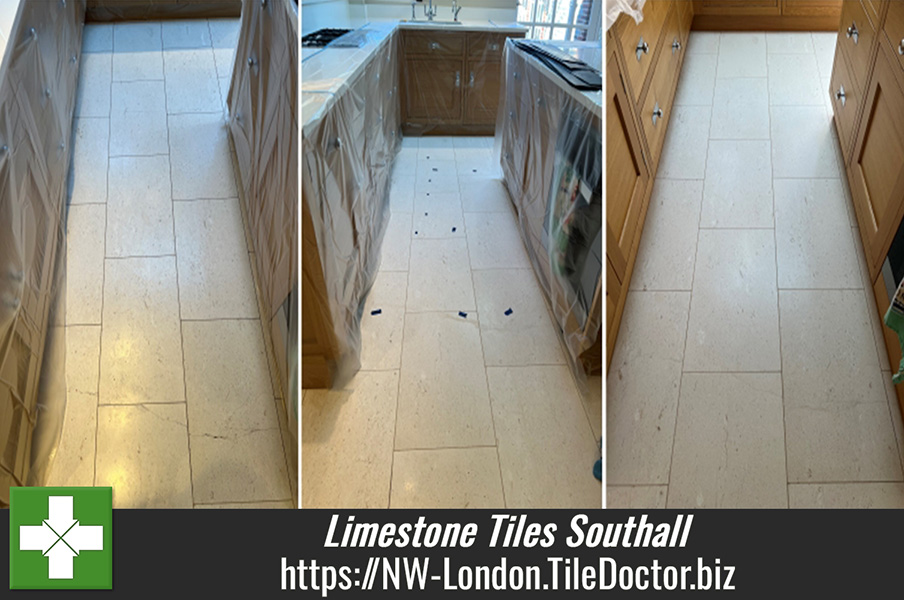
Details below of the restoration of a Limestone floor at a beautiful 1930’s property in Southall. The limestone looked like it had suffered from movement in the foundations as there were many cracks in the tiles throughout the kitchen. Additionally, the grout lines had become darkened with dirt over time and the pitting in the tiles had also attracted dirt, darkening the appearance of the floor.

Limestone Tiled Kitchen Floor Before Cleaning in Southall Limestone Tiled Kitchen Floor During Cleaning in Southall

The client enquired about cleaning the floor, repairing the cracks and sealing the tiles so I arranged to visit the property to survey the floor and work out a quote. Once I had made a note of all the issues, I worked out a restoration plan which I used to work out a detailed quote for the work which was accepted.

Cleaning and Repairing a Limestone Tiled Kitchen

The first job was to cover the kitchen unites with plastic wrap and protect any vulnerable areas. Then a strong dilution of Tile Doctor Pro-Clean was sprayed onto the floor and left to soak in for ten minutes. The solution was then scrubbed into the tile and grout with a rotary machine fitted with a black pad and by hand using a stiff brush where needed.

A steamer was used to deep clean the pits in the Limestone and lighten the look of them. Next, the cracks were filled using a polyresin filler which was mixed to get the best colour match. there were about 10-15 cracks to fill in total.

Cracked Limestone Tiled Kitchen Floor Repair Cleaning and Polishing Southall

Once the filler had dried the filler was sanded using a set of handheld diamond hand burnishing blocks of increasingly finer grits. This was done to remove the excess resin leaving a smooth finish and ensure the was no shadowing along the crack.

With the filling complete the next step was to hone the Limestone floor using a couple of diamond encrusted burnishing pads which further clean the stone and bring up its appearance. The process starts with a coarse 400-grit pad which is fitted to the rotary buffer and run over the floor with water which lubricates the process. Once each tile has been burnished three of four times the soiling generated is rinsed off the floor with water and extracted with a wet vacuum.

Limestone Kitchen Tiles During Honing in Southall Limestone Kitchen Floor During Honing in Southall

The pad is then changed for a finer 800-grit pad and the process repeated to leave a natural, matt finish as per the client’s request. Again, water was used to lubricate the process and then a wet vacuum used to remove all the soiling and excess water. Once done the tiles were wiped to remove any residue and then left to dry.

Sealing a Limestone Kitchen Tiles

To seal the tiles Tile Doctor Ultra-Seal was applied with a dry microfibre cloth and then left to absorb into the stone. This is an impregnating seal that does not sit on top of the tile, it soaks into the pores to prevent dirt from residing there. Once the seal had impregnated into the tile the floor was buffed using a white pad fitted to the rotary machine to remove excess sealer and give a consistent and uniform finish.

Limestone Tiled Kitchen Floor Sealed with Ultra-Seal in Southall Limestone Tiled Kitchen Floor After Cleaning and Honing Southall

The client was really pleased with the results, and the filled cracks blended well into the floor making them unnoticeable. The process also made the kitchen feel a lot brighter and resulted in the following customer feedback:

“Communication was speedy and my tricky tile problems were resolved better than I thought by Tile Doctor. Visitors have been commenting how much brighter and more detailed my stone floor is now, and the cracks have been stabilised so well. Very happy.”

For aftercare cleaning I recommended Tile Doctor Stone Soap as this contains a patina enhancer that will help maintain the appearance of the tiles.


Professional Restoration of a Cracked Limestone Tiled Kitchen in Northwest London

Cracked Limestone Tiled Kitchen Floor Fully Restored in Southall Read More »

Black Slate Floor Renovation Acton

Restoring Stained Black Slate Tiled Floor at Acton House Renovation

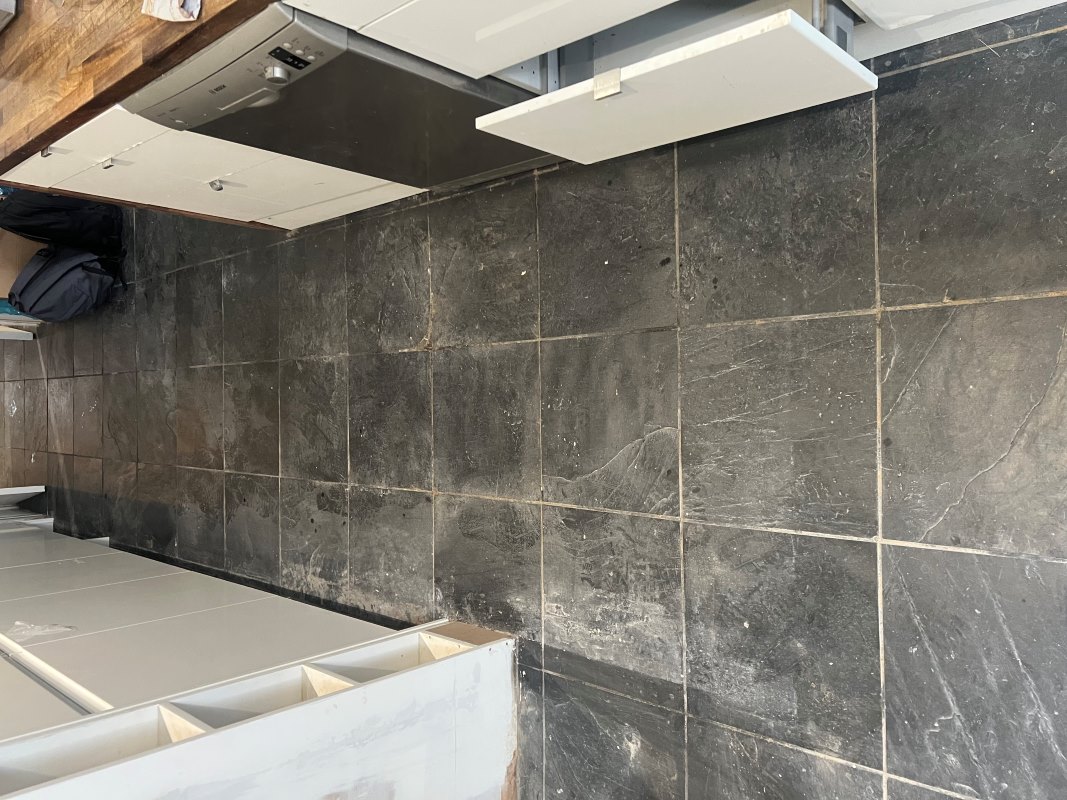
We received an enquiry from a property developer who had been renovating a property in Acton and needed our help to renovate the Black Slate tiles that had been installed throughout the ground floor. The slate floor had been down over 20 years and ran throughout the downstairs living space. Due to all the work being carried out the black slate had become very dirty with building material and had turned white with staining in many areas. They were uncertain if the floor could be restored but were reluctant to consider relaying it due to the expense.

Slate Floor Before Renovation Acton

As usual I went over to the property to understand the nature of the staining and work out the best products and processes for the renovation. There were multiple floors that needed attention so I measured up and worked out a detailed quote that included all the materials that would be needed. After reviewing the quote, I was given the go ahead and a date agreed for the work to start.

Cleaning a Slate Tiled Kitchen

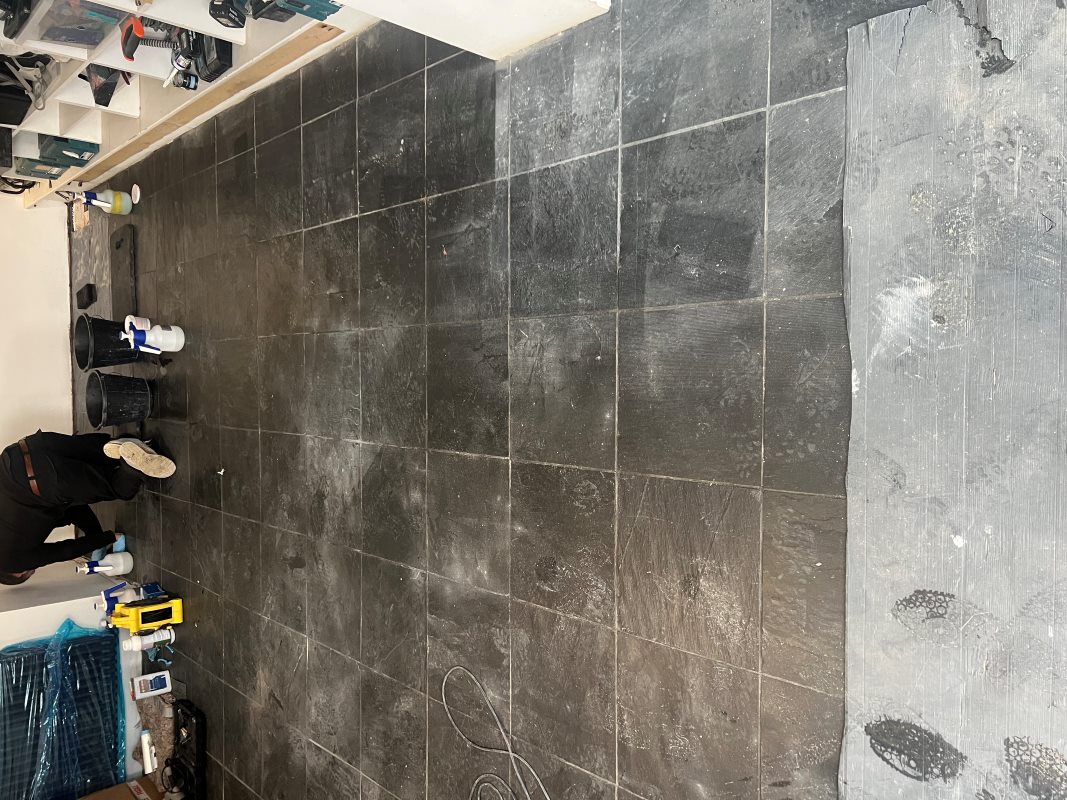
To clean the floor, a strong solution of Tile Doctor Pro-Clean was applied to the floor and then scrubbed in with a black buffing pad fitted to a rotary machine. These pads can struggle to reach into the grout lines so they were given an extra clean using handheld scrubbing brushes. This combination brought the dirt out of the floor to the surface where it could be extracted with a wet vacuum.

Slate Floor During Renovation Acton

Tougher stains on the tiles were spot treated using more Pro-Clean and some of the grouting had to be scrubbed harder with wire brushes until the whole floor was consistently clean throughout.

Slate Floor During Renovation Acton

Once done the floor was rinsed with a very weak dilution of Tile Doctor Grout Clean-Up to further clean the floor and neutralise it following the use of Pro-Clean which is a strong alkaline. The solution was then extracted with a wet vacuum and floor left to dry.

Sealing a Slate Tiled Kitchen

Once dry it was time to seal the floor which will protect it from ingrained dirt and enhance the finish. For this Tile Doctor Stone Oil was applied which being oil-based really improves the texture and dark colour of the stone.

The sealer is applied using a microfibre cloth and any excess product is wiped off before buffing with a white buffing pad on the rotary machine. This left a nice sheen to the tile and a consistent look throughout.

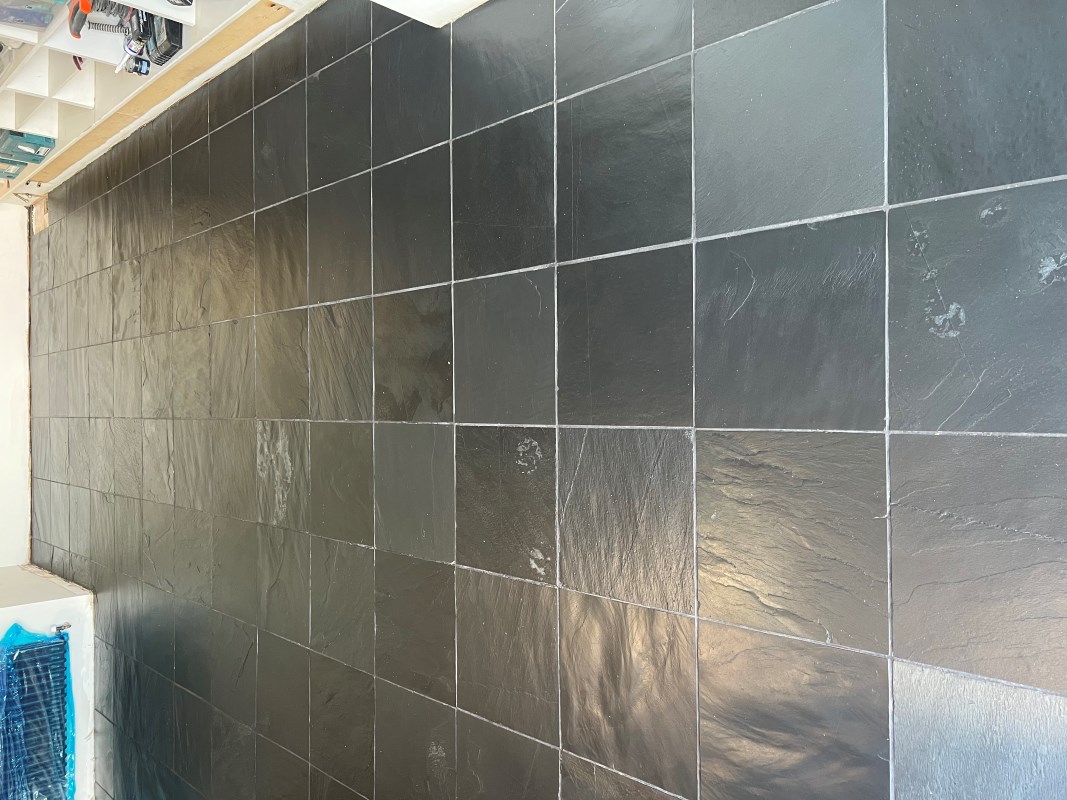
Slate Floor After Renovation Acton

Our client was very happy with the finish, the Slate and Grout had been transformed and the sealer had really enhanced the look of the slate. For aftercare we recommended using Tile Doctor Neutral Cleaner which will provide effective cleaning whilst not impacting the seal.

Slate Floor After Renovation Acton


Professional Restoration of a Slate Tiled Kitchen in Northwest London

Restoring Stained Black Slate Tiled Floor at Acton House Renovation Read More »

Porcelain Tiled Floor Cleaning in Pinner

Deep Cleaning Grout-Stained Porcelain Tiled Floor in Pinner

This customer from Pinner contacted us regarding their Porcelain tiled floor which hadn’t been professionally cleaned for a couple of years. As well as deep cleaning the tile and grout they were keen for us to remove some staining and grout marks that must have been there since the floor was laid.

Removing stubborn grout from tiling is a common problem known as Grout Haze and fortunately there is a solution, in that it can be removed by giving the tiles a scrub with an acidic tile cleaner called Tile Doctor Grout Clean-up. Also, it’s worth bearing in mind that Porcelain tiles are generally impermeable but the top layer of grout being rough does trap dirt. As a result, we often find that pale or white grout appears to darken quite quickly. This is often exacerbated during cleaning as the dirty water from the tile gets washed into the recesses of the grout line.

Porcelain Tiled Floor Before Cleaning in Pinner

Happy to assist I arranged to carry out a test clean at their property which would then form the basis of a quotation. For the test we carried out an acid wash on the grout staining and gave the darkened grout lines a good scrub with the same product. This worked really well along with a magic eraser sponge to complete the clean and remove any residue. A heat gun was used to dry the grout lines in order to show the customer what the result would look like. The couple were amazed at the instant change and how well the tile and grout lines cleaned up. We also tested an area where grout had not been fully removed when they were laid and left to dry on the tile, using the same process, we were able to remove it.

Keen to have the whole floor treated in the same way I worked out a quote which was accepted and a date scheduled.

Removing Grout Haze from Pale Porcelain Kitchen Tiles

When we returned to complete the whole floor we used same process as before with various dilutions of Tile Doctor Grout Clean-Up depending on the nature of the staining. Before starting though plastic wrap was used to cover and protect any areas that could be affected by the cleaning product which is acidic. The customer had an amazing built-in wine cellar in the floor of the living room with a glass door so was important to ensure that was well protected.

Porcelain Tiled Floor During Cleaning in Pinner

The cleaning involved decanting the diluted Grout Clean-up into a spray bottle and then spraying the tile and grout. The solution was then left to soak in for a good ten minutes (sometimes longer) before using a black pad fitted to a rotary machine to scrub the floor. In some areas the grout haze was quite thick, so it was necessary to use a single edge steel blade to scrape the bulk of the grout off first. The grout was hand-scrubbed as the recessed grout line can be difficult to reach with a pad; the floor was laid with large format tiles however so the grout lines were minimal.

Porcelain Tiled Floor Grout Haze Removal in Pinner

Once we had completed the clean through the Kitchen, living room, entrance hall, toilet and utility we used a steam mop to ensure there was no chemical residue on the floor. Finally, we used our buffing machine with a white buffing pad to ensure there were no streak marks left on the tile, and to bring up the finish.

Porcelain Tiled Floor During Steam Cleaning in Pinner

The customers were really pleased with the finish throughout and commented how well it had cleaned up. We discussed maintenance going forward and suggested using Tile Doctor Neutral Cleaner for regular cleaning.

Porcelain Tiled Floor After Cleaning in Pinner Porcelain Tiled Floor After Cleaning in Pinner


Professional Renovation of a Porcelain Tiled Floor in Northwest London

Deep Cleaning Grout-Stained Porcelain Tiled Floor in Pinner Read More »

Edwardian Hallway Floor Restoration Perivale

Carpet Covered Encaustic Cement Tiled Hallway Floor Rescued in Perivale

Detailed below is the major restoration of an Encaustic Cement tiled floor at an Edwardian property in the West London suburb of Perivale. At some point in its history this beautiful and practical floor was covered up with cement screen and then carpeted. The current owner who was aware of the tiled floor underneath contacted us to see if that could be removed and the floor restored to its original condition.

I paid a visit to the property to survey the floor and get a better idea of the work involved. Naturally with the floor covered in carpet it’s impossible to know what condition the floor was in however having done this work before we had a good idea of what would be needed.

Edwardian Hallway Floor Before Restoration Perivale

During our visit a section of the carpet was peeled back and we ran a small cleaning test to understand how difficult it would be to remove the cement leveller. The floor responded well to this and we were able to reveal a small section of intact tiled floor in reasonable condition.

Naturally without the whole floor exposed it would be difficult to provide a quote for its restoration however we were able to give the owner an estimate which was accepted.

Cleaning and Repairing a Victorian Tiled Hallway Floor

The first step was to carefully remove the carpet and gripper rods which had been fixed in place with adhesive. Free of its covering work then moved onto the chipping away of the self-levelling cement which was done carefully by hand. Our fingers were crossed that we wouldn’t reveal or cause for that matter any major damage.

Edwardian Hallway Floor During Cement Removal Perivale

Thankfully the floor was intact and with no repairs required work progressed onto cleaning. To do this the floor was first scrubbed using Tile Doctor Grout Clean-Up which is an acidic product that we normally use for removing excess grout however in this case it proved useful in removing the excess cement. A strong dilution was brushed onto the tiles and then left for ten minutes before scrubbing in with a coarse 100-grit diamond pad. More water was used to rinse the soiled solution off the floor before extracting with a wet vacuum.

< Edwardian Hallway Floor During Machine Cleaning Perivale.JPG>
This process was then repeated using a strong dilution of Tile Doctor Pro-Clean which is an alkaline Tile and Grout Cleaner. As before it was brushed onto the floor, left to soak in and then scrubbed in with a diamond pad, this time using a finer 200-grit.

Edwardian Hallway Floor After Cleaning Perivale

During the cleaning, we had noticed a few cracked tiles that needed replacing. Replacements were sourced and with the cleaning complete and the damaged tiles were carefully removed and replaced. Once grouted in and set the floor was given a final rinse and extraction with the wet vacuum.

Sealing a Victorian Tiled Hallway Floor

To seal the floor, we first used a consolidator primer seal, Tile Doctor Colour Grow, followed by five applications of a protective acrylic seal Tile Doctor Seal and Go, which gave the floor a durable rich satin finish. Both these products are breathable which is an important consideration when dealing with and old floor that won’t have the benefit of a damp-proof-membrane.

Edwardian Hallway Floor After Sealing Perivale Edwardian Hallway Floor After Restoration Perivale

The restoration involved three experienced Tile Doctor technicians working over a period of three consecutive days. Once complete the floor was completely transformed and really lifted the hallway. Period features like this are very sought after and add a lot of value to old properties.

Following the completion of the floor we have advised the customer to maintain the tiles using Tile Doctor Neutral Cleaner which has a neutral pH and so will not impact the sealer.


Restoration of a Victorian Tiled Hallway in Hertfordshire

Carpet Covered Encaustic Cement Tiled Hallway Floor Rescued in Perivale Read More »

Quarry Tiled Floor Restoration Chiswick

100-Year-Old Quarry Tiled Kitchen Floor Restored in Chiswick

This is an original well-worn quarry tiled kitchen floor in Chiswick that we suspect was at least 100 years old. We were asked if we could bring the natural colour and rich lustre to the tiles and carry out some tile and grout remedial work to sharpen up the appearance.

Quarry Tiled Floor Before Restoration Chiswick

I paid a visit to the property to survey the floor and prepare a quote for its renovation. The tiles were surprisingly sound given their age however they were looking very worn and tired and as mentioned by the owner there were several areas were the grouting needed replacing. There was also a second section of tiling that had been added later than the original following the removal of a fireplace.

Quarry Tiled Floor Before Restoration Chiswick

After discussing the scope of the work needed, I worked out a quote that would include the repairs and also a deep clean and seal of both sections of quarry tiles. Happy with the quote, a date was set for the work to start.

Cleaning a Quarry Tiled Kitchen

Work started with cleaning both sections of quarry tiles using a strong dilution of Tile Doctor Pro-Clean to remove oil and grease stains and any remaining protecting coatings. The solution was mopped on to the floor, left for ten minutes and then scrubbed in using an orbital machine fitted with a black pad running at slow speed. Once done, the floor was fully rinsed and the soiling extracted. Following this the tiles were given a steam clean to remove some stubborn staining and then left to dry off overnight.

The next day a single coat of Tile Doctor Colour Grow was applied to the quarry tiles. Being an impregnator, this provides a good base sealer for quarry tiles providing additional stain protection and improving colour.

Quarry Tiled Floor During Grout Repair and Cleaning Chiswick

Next, we carried out grout repairs to several sections of the floor. This involved carefully removing the old grout, replacing with a new grout in a matching tone and then cleaning off the excess ready for final sealing.

Quarry Tiled Floor During Grout Repair and Cleaning Chiswick

Sealing a Quarry Tiled Kitchen

To complete the sealing, six light coats of Tile Doctor Seal and Go were added to the floor to provide a durable rich satin seal finish.

Quarry Tiled Floor After Restoration Chiswick

The work was completed by two Tile Doctor technicians in two days and once complete our client was delighted, so much so they left the following comment on our feedback system:

“Tile Doctor renovated our kitchen quarry tiles. Rob and his team were efficient and professional, and the end result was excellent.”

Quarry Tiled Floor After Restoration Chiswick

Before leaving we discussed aftercare cleaning for which I recommended Tile Doctor Neutral Tile Cleaner which is designed for cleaning sealed surfaces.


Professional Restoration of a Quarry Tiled Kitchen Floor in West London

100-Year-Old Quarry Tiled Kitchen Floor Restored in Chiswick Read More »

Marble Tiled Hallway Floor Renovation Uxbridge

Classic Black and White Tiled Chequered Floor Renovated in Uxbridge

We received an enquiry regarding a classic chequered Marble tiled entrance hall at a lovely county residence near Uxbridge. The property had been undergoing significant refurbishment and the company doing the work had covered the floor with protective sheeting for a year. With the majority of the work out of the way we were asked to come over and quote for renovating the tiles. This was to include removing any staining, honing the stone to bring back its polished appearance and then sealing to protect it.

Marble Tiled Hallway Floor Before Cleaning Uxbridge

I paid a visit to the property to survey the floor and realised that the White tiles were Marble and the Black tiles Limestone. Not that this would make a difference as the work required would be the same. After measuring up and working out a renovation plan, a quote was provided to the renovation company who were happy for us to proceed.

Cleaning a Marble and Black Limestone Tiled Entrance Hall

Work started with the removal of the protective sheeting and then cleaning with a strong solution of Tile Doctor Pro-Clean. This was left to soak in for ten minutes before being slowly worked into each tile with a Black scrubbing pad fitted to a rotary machine.

Tile Doctor Pro-Clean is a versatile tile cleaning product that when applied in a strong dilution can remove oil, grease stains and old protecting coatings including waxes. Once the whole floor had been cleaned in this manner the solution was rinsed off with water and the soiling extracted with a wet vacuum.

The next step was to hone the stone floor using a series of Tile Doctor Burnishing pads starting with a coarse 400-grit to open up the pores and flush out the dirt. The pads are applied with water for lubrication and the soiling generated is extracted with a wet vacuum afterwards. The process was then repeated using the 800 and then 1500-grit burnishing pads rinsing and extracting after each pad. These finer pads close the pores and add a polished honed finish to the stone. This left the floor with a silky-smooth finish with a reflective light sheen.

Marble Tiled Hallway Floor During Cleaning Uxbridge

Sealing a Classic Chequered Marble and Limestone Tiled Entrance Hall Floor

Once dry, the tiles were treated with two applications of Tile Doctor Colour Grow which is an impregnating sealer that enriches the colours and provides durable stain protection. Once the whole floor had been sealed it was buffed with a White pad to remove any excess sealer and further bring up the polished appearance of the stone.

Marble Tiled Hallway Floor During Sealing Uxbridge

With two Tile Doctor technicians working together we were able to complete the whole floor in one day, much to the delight of the client who was keen to get the renovation finished.

Marble Tiled Hallway Floor After Renovation Uxbridge

For aftercare of a polished stone floor, I recommended Tile Doctor Stone Soap which is sealer safe and helps maintain the patina on the stone.

Marble Tiled Hallway Floor After Sealing Uxbridge


Professional Restoration of a Marble and Limestone Floor in North West London

Classic Black and White Tiled Chequered Floor Renovated in Uxbridge Read More »

Black Limestone Kitchen Floor Renovation Northolt

Altering and Renovating a Black Limestone Kitchen Floor in Northolt

The photographs below are from a 1900’s cottage in Northolt which had a black limestone floor installed in the kitchen. The owners had recently had a new kitchen installed which had a slightly different layout to the original thereby leaving previously covered areas exposed. The client wanted the tiles to be cleaned, and re-sealed and two new tiles installed to cover the newly exposed floor.

Black Limestone Kitchen Floor Before Renovation Northolt

As usual I went over to the property to survey the existing floor and understand the scope of the work required. From this I was able to work out a quote which was accepted and a date agreed for our return.

Black Limestone Kitchen Floor Before Renovation Northolt Black Limestone Kitchen Floor Before Renovation Northolt

Cleaning a Black Limestone Tiled Kitchen Floor

Before starting work all the new kitchen fronts were wrapped in a plastic sheet to protect them from splashing and the plinths (kickboards) under the kitchen removed.

Work then started by addressing the tiling changes which basically involved laying two new pieces of matching black Limestone tile we had procured earlier. The Limestone was then cut to shape and fitted into the newly exposed area of floor with a rapid set adhesive. The floor was then left to set before being grouted in using a matching grout.

Black Limestone Kitchen Floor During Repair Northolt Black Limestone Kitchen Floor During Cleaning Northolt

Once the grout had set, focus moved onto cleaning the tiles and stripping off any old sealer that was present using a strong dilution of Tile Doctor Pro-Clean. The kitchen floor was too small to introduce a large buffing machine for this work so after leaving the product to soak in for ten minutes the limestone tile and grout were scrubbed by hand.

Once done, the floor was rinsed with water and the dirty cleaning solution extracted with a wet vacuum. The floor was then inspected and any stubborn areas spot cleaned using the same process. When I was satisfied the floor was as clean as it could be a heat gun was applied to dry the tiles.

Sealing a Black Limestone Tiled Kitchen

Once I was happy the floor was dry it was sealed using a light application of Tile Doctor Stone Oil to enhance the rich dark colour of the limestone. After further drying the floor was sealed with two applications of Tile Doctor Colour Grow to seal in the stone oil and give extra protection and a uniform appearance.

Black Limestone Kitchen Floor During Sealing Northolt

The work completely transformed the kitchen much to the delight of the owner who left the following feedback:

“Great, professional, friendly, efficient service. Cleaned and re-sealed our black limestone kitchen floor tiles, plus fitting a spare. Great job. Would definitely recommend.”

Black Limestone Kitchen Floor After Renovation Northolt

Before leaving we discussed aftercare cleaning for which I recommended Tile Doctor Neutral Tile Cleaner which is designed for cleaning sealed surfaces.

Black Limestone Kitchen Floor After Renovation Northolt


Professional Restoration of a Black Slate Tiled Kitchen in Northwest London

Altering and Renovating a Black Limestone Kitchen Floor in Northolt Read More »

=================================

North West London Tile Doctor

================================= Read More »

╳
Scroll to Top